使用堆栈创建适应数据和环境变化的动态对齐。
当您需要传达的信息来自包含文本和图像的可变数据源时,以可自适应的方式对齐内容至关重要。本教程将指导您如何使用堆叠按行和列对齐内容。此外,它还使用堆叠创建有助于组织信息的图形元素。
要试验代码,请下载项目文件并在 Xcode 中打开示例。
第 1 部分
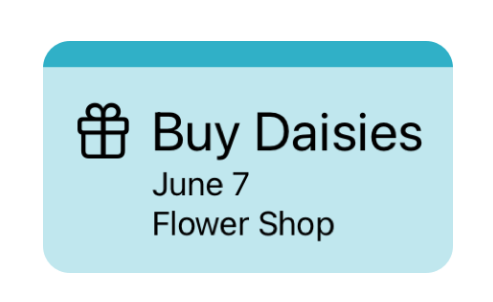
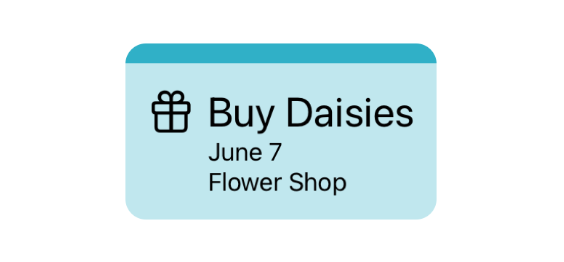
使用视图模型管理相关数据 定义视图的第一步是确定视图显示的数据。此视图布局显示即将举行的活动的详细信息,包括活动名称、日期和地点。它还包含一个指示活动类型的图标。
为了将相关数据组织到视图模型中,此示例定义了一个自定义结构。
步骤 1
此 Event 结构体定义了事件的所有数据。日期是一个 Date 值,而不是格式化的 String ,因此视图可以指定日期格式。symbol symbol 是 Event Tile 中要显示的 SF 符号的名称。
import SwiftUI


struct Event {
    let title: String
    let date: Date
    let location: String
    let symbol: String
}


struct EventTile: View {
    let event: Event
    let stripeHeight = 15.0
    var body: some View {
        HStack(alignment: .firstTextBaseline) {
            Image(systemName: event.symbol)
                .font(.title)
            VStack(alignment: .leading) {
                Text(event.title)
                    .font(.title)
                Text(
                    event.date,
                    format: Date.FormatStyle()
                        .day(.defaultDigits)
                        .month(.wide)
                )
                Text(event.location)
            }
        }
        .padding()
        .padding(.top, stripeHeight)
        .background {
            ZStack(alignment: .top) {
                Rectangle()
                    .opacity(0.3)
                Rectangle()
                    .frame(maxHeight: stripeHeight)
            }
            .foregroundColor(.teal)
        }
        .clipShape(RoundedRectangle(cornerRadius: stripeHeight, style: .continuous))
    }
}


struct EventTile_Previews: PreviewProvider {
    static let event = Event(title: "Buy Daisies", date: .now, location: "Flower Shop", symbol: "gift")

    static var previews: some View {
        EventTile(event: event)
    }
}
第 2 步
Event Tile 从 Tile 的 event 属性中的 Event 结构中获取特定实例的所有数据。
import SwiftUI


struct Event {
    let title: String
    let date: Date
    let location: String
    let symbol: String
}


struct EventTile: View {
    let event: Event
    let stripeHeight = 15.0
    var body: some View {
        HStack(alignment: .firstTextBaseline) {
            Image(systemName: event.symbol)
                .font(.title)
            VStack(alignment: .leading) {
                Text(event.title)
                    .font(.title)
                Text(
                    event.date,
                    format: Date.FormatStyle()
                        .day(.defaultDigits)
                        .month(.wide)
                )
                Text(event.location)
            }
        }
        .padding()
        .padding(.top, stripeHeight)
        .background {
            ZStack(alignment: .top) {
                Rectangle()
                    .opacity(0.3)
                Rectangle()
                    .frame(maxHeight: stripeHeight)
            }
            .foregroundColor(.teal)
        }
        .clipShape(RoundedRectangle(cornerRadius: stripeHeight, style: .continuous))
    }
}


struct EventTile_Previews: PreviewProvider {
    static let event = Event(title: "Buy Daisies", date: .now, location: "Flower Shop", symbol: "gift")

    static var previews: some View {
        EventTile(event: event)
    }
}
步骤3
Event Tile 视图的三个不同部分需要使用顶部条纹的高度,因此它也是 body 之外的属性。
这是此布局中唯一指定尺寸的常量。此视图的所有其他尺寸都取决于 Event 中的数据以及修饰符中的语义值,例如 font(_😃 。
import SwiftUI


struct Event {
    let title: String
    let date: Date
    let location: String
    let symbol: String
}


struct EventTile: View {
    let event: Event
    let stripeHeight = 15.0
    var body: some View {
        HStack(alignment: .firstTextBaseline) {
            Image(systemName: event.symbol)
                .font(.title)
            VStack(alignment: .leading) {
                Text(event.title)
                    .font(.title)
                Text(
                    event.date,
                    format: Date.FormatStyle()
                        .day(.defaultDigits)
                        .month(.wide)
                )
                Text(event.location)
            }
        }
        .padding()
        .padding(.top, stripeHeight)
        .background {
            ZStack(alignment: .top) {
                Rectangle()
                    .opacity(0.3)
                Rectangle()
                    .frame(maxHeight: stripeHeight)
            }
            .foregroundColor(.teal)
        }
        .clipShape(RoundedRectangle(cornerRadius: stripeHeight, style: .continuous))
    }
}


struct EventTile_Previews: PreviewProvider {
    static let event = Event(title: "Buy Daisies", date: .now, location: "Flower Shop", symbol: "gift")

    static var previews: some View {
        EventTile(event: event)
    }
}
第 2 节
定义具有嵌套堆栈的视图 定义数据模型后,您可以创建视图来显示该数据,并使用堆栈和对齐来组织这些视图。
VStack 将文本排列在一列中, HStack 将图标与标题文本对齐。
步骤 1
VStack 上的 leading 对齐方式覆盖了堆栈的默认 center 对齐方式。
import SwiftUI


struct Event {
    let title: String
    let date: Date
    let location: String
    let symbol: String
}


struct EventTile: View {
    let event: Event
    let stripeHeight = 15.0
    var body: some View {
        HStack(alignment: .firstTextBaseline) {
            Image(systemName: event.symbol)
                .font(.title)
            VStack(alignment: .leading) {
                Text(event.title)
                    .font(.title)
                Text(
                    event.date,
                    format: Date.FormatStyle()
                        .day(.defaultDigits)
                        .month(.wide)
                )
                Text(event.location)
            }
        }
        .padding()
        .padding(.top, stripeHeight)
        .background {
            ZStack(alignment: .top) {
                Rectangle()
                    .opacity(0.3)
                Rectangle()
                    .frame(maxHeight: stripeHeight)
            }
            .foregroundColor(.teal)
        }
        .clipShape(RoundedRectangle(cornerRadius: stripeHeight, style: .continuous))
    }
}


struct EventTile_Previews: PreviewProvider {
    static let event = Event(title: "Buy Daisies", date: .now, location: "Flower Shop", symbol: "gift")

    static var previews: some View {
        EventTile(event: event)
    }
}
第 2 步
Text 初始化器 init(_: format:) 格式化日期。
此初始化程序会自动考虑特定于环境的条件,例如当前日历和语言环境。
import SwiftUI


struct Event {
    let title: String
    let date: Date
    let location: String
    let symbol: String
}


struct EventTile: View {
    let event: Event
    let stripeHeight = 15.0
    var body: some View {
        HStack(alignment: .firstTextBaseline) {
            Image(systemName: event.symbol)
                .font(.title)
            VStack(alignment: .leading) {
                Text(event.title)
                    .font(.title)
                Text(
                    event.date,
                    format: Date.FormatStyle()
                        .day(.defaultDigits)
                        .month(.wide)
                )
                Text(event.location)
            }
        }
        .padding()
        .padding(.top, stripeHeight)
        .background {
            ZStack(alignment: .top) {
                Rectangle()
                    .opacity(0.3)
                Rectangle()
                    .frame(maxHeight: stripeHeight)
            }
            .foregroundColor(.teal)
        }
        .clipShape(RoundedRectangle(cornerRadius: stripeHeight, style: .continuous))
    }
}


struct EventTile_Previews: PreviewProvider {
    static let event = Event(title: "Buy Daisies", date: .now, location: "Flower Shop", symbol: "gift")

    static var previews: some View {
        EventTile(event: event)
    }
}
步骤3
title 字体使标题文本和礼物图像比默认 body 字体中的任何内容更加突出。
精确的字体大小和粗细取决于环境,包括用户当前的动态类型设置。
实验 使用在 UI 中配置和显示符号图像中的技术来定制此符号。
import SwiftUI


struct Event {
    let title: String
    let date: Date
    let location: String
    let symbol: String
}


struct EventTile: View {
    let event: Event
    let stripeHeight = 15.0
    var body: some View {
        HStack(alignment: .firstTextBaseline) {
            Image(systemName: event.symbol)
                .font(.title)
            VStack(alignment: .leading) {
                Text(event.title)
                    .font(.title)
                Text(
                    event.date,
                    format: Date.FormatStyle()
                        .day(.defaultDigits)
                        .month(.wide)
                )
                Text(event.location)
            }
        }
        .padding()
        .padding(.top, stripeHeight)
        .background {
            ZStack(alignment: .top) {
                Rectangle()
                    .opacity(0.3)
                Rectangle()
                    .frame(maxHeight: stripeHeight)
            }
            .foregroundColor(.teal)
        }
        .clipShape(RoundedRectangle(cornerRadius: stripeHeight, style: .continuous))
    }
}


struct EventTile_Previews: PreviewProvider {
    static let event = Event(title: "Buy Daisies", date: .now, location: "Flower Shop", symbol: "gift")

    static var previews: some View {
        EventTile(event: event)
    }
}
步骤4
HStack 中的 first Text Baseline 对齐将礼物图像与标题文本对齐。
笔记 如果您要排列文本和符号,并且只需使它们彼此对齐,最好使用 Label 。 Label 默认将其图标与标题的第一条基线对齐,并根据其出现的上下文进行调整。
import SwiftUI


struct Event {
    let title: String
    let date: Date
    let location: String
    let symbol: String
}


struct EventTile: View {
    let event: Event
    let stripeHeight = 15.0
    var body: some View {
        HStack(alignment: .firstTextBaseline) {
            Image(systemName: event.symbol)
                .font(.title)
            VStack(alignment: .leading) {
                Text(event.title)
                    .font(.title)
                Text(
                    event.date,
                    format: Date.FormatStyle()
                        .day(.defaultDigits)
                        .month(.wide)
                )
                Text(event.location)
            }
        }
        .padding()
        .padding(.top, stripeHeight)
        .background {
            ZStack(alignment: .top) {
                Rectangle()
                    .opacity(0.3)
                Rectangle()
                    .frame(maxHeight: stripeHeight)
            }
            .foregroundColor(.teal)
        }
        .clipShape(RoundedRectangle(cornerRadius: stripeHeight, style: .continuous))
    }
}


struct EventTile_Previews: PreviewProvider {
    static let event = Event(title: "Buy Daisies", date: .now, location: "Flower Shop", symbol: "gift")

    static var previews: some View {
        EventTile(event: event)
    }
}
第 3 节
添加具有分层形状的背景 为了表明所有这些信息都代表单个事件, background(alignment:content:) 修饰符包含一个 Shape 视图的 ZStack 。
这定义了一个适应主视图显示的信息大小的背景。
步骤 1
为了使背景比包含所有内容的 HStack 更大,此 padding(_: _😃 修饰符在视图的所有四个边缘添加了一些空间。
import SwiftUI


struct Event {
    let title: String
    let date: Date
    let location: String
    let symbol: String
}


struct EventTile: View {
    let event: Event
    let stripeHeight = 15.0
    var body: some View {
        HStack(alignment: .firstTextBaseline) {
            Image(systemName: event.symbol)
                .font(.title)
            VStack(alignment: .leading) {
                Text(event.title)
                    .font(.title)
                Text(
                    event.date,
                    format: Date.FormatStyle()
                        .day(.defaultDigits)
                        .month(.wide)
                )
                Text(event.location)
            }
        }
        .padding()
        .padding(.top, stripeHeight)
        .background {
            ZStack(alignment: .top) {
                Rectangle()
                    .opacity(0.3)
                Rectangle()
                    .frame(maxHeight: stripeHeight)
            }
            .foregroundColor(.teal)
        }
        .clipShape(RoundedRectangle(cornerRadius: stripeHeight, style: .continuous))
    }
}


struct EventTile_Previews: PreviewProvider {
    static let event = Event(title: "Buy Daisies", date: .now, location: "Flower Shop", symbol: "gift")

    static var previews: some View {
        EventTile(event: event)
    }
}
第 2 步
在主内容上第二次使用相同的 padding(_: 😃 修饰符,除了前一个 padding(: _😃 修饰符定义的空间之外,还为视图顶部的条纹添加了空间。
import SwiftUI


struct Event {
    let title: String
    let date: Date
    let location: String
    let symbol: String
}


struct EventTile: View {
    let event: Event
    let stripeHeight = 15.0
    var body: some View {
        HStack(alignment: .firstTextBaseline) {
            Image(systemName: event.symbol)
                .font(.title)
            VStack(alignment: .leading) {
                Text(event.title)
                    .font(.title)
                Text(
                    event.date,
                    format: Date.FormatStyle()
                        .day(.defaultDigits)
                        .month(.wide)
                )
                Text(event.location)
            }
        }
        .padding()
        .padding(.top, stripeHeight)
        .background {
            ZStack(alignment: .top) {
                Rectangle()
                    .opacity(0.3)
                Rectangle()
                    .frame(maxHeight: stripeHeight)
            }
            .foregroundColor(.teal)
        }
        .clipShape(RoundedRectangle(cornerRadius: stripeHeight, style: .continuous))
    }
}


struct EventTile_Previews: PreviewProvider {
    static let event = Event(title: "Buy Daisies", date: .now, location: "Flower Shop", symbol: "gift")

    static var previews: some View {
        EventTile(event: event)
    }
}
步骤3
background(alignment:content:) 修饰符的大小取决于它所修改的视图的大小,并将其内容置于该视图后面。
import SwiftUI


struct Event {
    let title: String
    let date: Date
    let location: String
    let symbol: String
}


struct EventTile: View {
    let event: Event
    let stripeHeight = 15.0
    var body: some View {
        HStack(alignment: .firstTextBaseline) {
            Image(systemName: event.symbol)
                .font(.title)
            VStack(alignment: .leading) {
                Text(event.title)
                    .font(.title)
                Text(
                    event.date,
                    format: Date.FormatStyle()
                        .day(.defaultDigits)
                        .month(.wide)
                )
                Text(event.location)
            }
        }
        .padding()
        .padding(.top, stripeHeight)
        .background {
            ZStack(alignment: .top) {
                Rectangle()
                    .opacity(0.3)
                Rectangle()
                    .frame(maxHeight: stripeHeight)
            }
            .foregroundColor(.teal)
        }
        .clipShape(RoundedRectangle(cornerRadius: stripeHeight, style: .continuous))
    }
}


struct EventTile_Previews: PreviewProvider {
    static let event = Event(title: "Buy Daisies", date: .now, location: "Flower Shop", symbol: "gift")

    static var previews: some View {
        EventTile(event: event)
    }
步骤5
此 frame(width:height:alignment:) 修饰符指定条纹的高度,而其宽度则取决于其包含的视图。
在类似这种条纹的装饰 Shape 上指定框架是一种常见的图案。
笔记 在文本和控件上指定框架可能会影响这些视图的尺寸调整行为和可用性。要了解调整各种视图尺寸的最佳实践,请参阅维护内置视图的自适应尺寸 。
import SwiftUI


struct Event {
    let title: String
    let date: Date
    let location: String
    let symbol: String
}


struct EventTile: View {
    let event: Event
    let stripeHeight = 15.0
    var body: some View {
        HStack(alignment: .firstTextBaseline) {
            Image(systemName: event.symbol)
                .font(.title)
            VStack(alignment: .leading) {
                Text(event.title)
                    .font(.title)
                Text(
                    event.date,
                    format: Date.FormatStyle()
                        .day(.defaultDigits)
                        .month(.wide)
                )
                Text(event.location)
            }
        }
        .padding()
        .padding(.top, stripeHeight)
        .background {
            ZStack(alignment: .top) {
                Rectangle()
                    .opacity(0.3)
                Rectangle()
                    .frame(maxHeight: stripeHeight)
            }
            .foregroundColor(.teal)
        }
        .clipShape(RoundedRectangle(cornerRadius: stripeHeight, style: .continuous))
    }
}


struct EventTile_Previews: PreviewProvider {
    static let event = Event(title: "Buy Daisies", date: .now, location: "Flower Shop", symbol: "gift")

    static var previews: some View {
        EventTile(event: event)
    }
}
步骤6
将青色 foreground Color(_😃 应用于堆栈可指定堆栈中两个 Rectangle 视图的颜色。
import SwiftUI


struct Event {
    let title: String
    let date: Date
    let location: String
    let symbol: String
}


struct EventTile: View {
    let event: Event
    let stripeHeight = 15.0
    var body: some View {
        HStack(alignment: .firstTextBaseline) {
            Image(systemName: event.symbol)
                .font(.title)
            VStack(alignment: .leading) {
                Text(event.title)
                    .font(.title)
                Text(
                    event.date,
                    format: Date.FormatStyle()
                        .day(.defaultDigits)
                        .month(.wide)
                )
                Text(event.location)
            }
        }
        .padding()
        .padding(.top, stripeHeight)
        .background {
            ZStack(alignment: .top) {
                Rectangle()
                    .opacity(0.3)
                Rectangle()
                    .frame(maxHeight: stripeHeight)
            }
            .foregroundColor(.teal)
        }
        .clipShape(RoundedRectangle(cornerRadius: stripeHeight, style: .continuous))
    }
}


struct EventTile_Previews: PreviewProvider {
    static let event = Event(title: "Buy Daisies", date: .now, location: "Flower Shop", symbol: "gift")

    static var previews: some View {
        EventTile(event: event)
    }
}
步骤7
使用 clip Shape(_: style:) 和 Rounded Rectangle 形状剪切最终视图仅将圆角应用于最外边缘,而不是将每个视图的角都圆化。
这避免了将条纹 Rectangle 的底角弄圆。
import SwiftUI


struct Event {
    let title: String
    let date: Date
    let location: String
    let symbol: String
}


struct EventTile: View {
    let event: Event
    let stripeHeight = 15.0
    var body: some View {
        HStack(alignment: .firstTextBaseline) {
            Image(systemName: event.symbol)
                .font(.title)
            VStack(alignment: .leading) {
                Text(event.title)
                    .font(.title)
                Text(
                    event.date,
                    format: Date.FormatStyle()
                        .day(.defaultDigits)
                        .month(.wide)
                )
                Text(event.location)
            }
        }
        .padding()
        .padding(.top, stripeHeight)
        .background {
            ZStack(alignment: .top) {
                Rectangle()
                    .opacity(0.3)
                Rectangle()
                    .frame(maxHeight: stripeHeight)
            }
            .foregroundColor(.teal)
        }
        .clipShape(RoundedRectangle(cornerRadius: stripeHeight, style: .continuous))
    }
}


struct EventTile_Previews: PreviewProvider {
    static let event = Event(title: "Buy Daisies", date: .now, location: "Flower Shop", symbol: "gift")

    static var previews: some View {
        EventTile(event: event)
    }